Optimal loading plan calculation for containers, trucks, cargo trucks, and wagon cars: [1] |
|
.gif) [1] [1] |
.gif) [1] [1] |
Various options for viewing a loading plan: [2] |
 [2] [2] |
Loading Multiple Vehicles Simultaniously [3] |
.gif) [3] [3] |
Ability to load from the front, the side, or the top: [4] |
||
 [4] [4] |
 [4] [4] |
 [4] [4] |
Ability to choose the speed of the algorithm: [5] |
 [5] [5] |
Standard and user reports for printing a loading plan: [6] |
|||
 [6] [6] |
 [6] [6] |
 [6] [6] |
 [6] [6] |
Cargo Concentration [7] |
||
.gif) [7] [7] |
.gif) [7] [7] |
.gif) [7] [7] |
Cargo Grouping: "Undivisible Set", "Anti-theft", "Dangerous cargos" [8] |
|
 [8] [8] |
 [8] [8] |
Pre-Packing [9] |
 [9] [9] |
Mixed Palletization [10] |
 [10] [10] |
Loading Order [11] |
.gif) [11] [11] |
Additional loading [12] |
.gif) [12] [12] |
Additional Loading Recommendations [13] |
 [13] [13] |
Loading optimization based on cargo cost: [14] |
 [14] [14] |
Import/export of raw data and loading plans: [15] |
 [15] [15] |
Single user model for integration [16] |
 [16] [16] |
Enterprise model for intergration: [17] |
 [17] [17] |
Total weight limit [18] |
 [18] [18] |
Axle Weights [19] |
 [19] [19] |
Orientations allowed [20] |
|
 [20] [20] |
 [20] [20] |
Stacking Limits in kg: [21] |
||
 [21] [21] |
 [21] [21] |
 [21] [21] |
Extended Fragility [22] |
|
 [22] [22] |
 [22] [22] |
Temperature sensitive [23] |
 [23] [23] |
 [23] [23] |
Filling the space below a rounded railroad freight car roof: [24] |
.gif) [24] [24] |
_0.gif) |
_0.gif) |
| trucks/cargo trucks. | wagon cars. |
The software always begins loading from the back left corner (looking into the container from the open doors). The cargo is then optimally placed considering all other limitations on axel pressure, fragility of cargo, orientation within the compartment, and etc.
 |
The software gives 5 choices for viewing the calculated loading plan: “Summary”, ”Table”, ”3D view”, ”Steps”, and ”Remainder”.
In the “Table”, “3D view”, and “Steps” views, the details of each step can be also be configured: 1 object, a block of identical objects, a block of different objects, a plane of objects.
 [25]
[25]
"Summary".
General information about the loaded vehicle, quality of loading, linear meters of cargo, axel pressure and etc. is presented in this view as a static 3D image of the vehicle.
 [26]
[26]
"Table".
The table view of the loading process fully presents the coordinates for the placement of objects, distances from the sides and etc.
 [27]
[27]
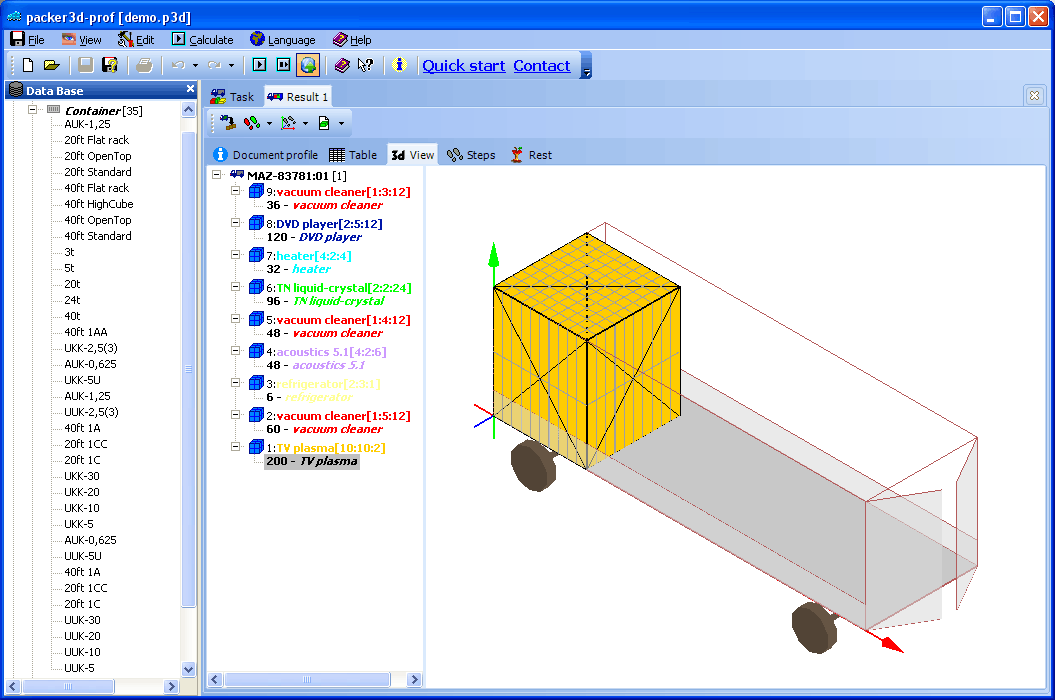
"3D view".
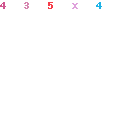
A dynamic, stepwise way of viewing the loading plan. The OpenGL library is used. The animation atop the given page was made in this manner. Scrolling through the steps allows one to view the loading of the vehicle dynamically. The image can be frozen at any step, then rotated, zoomed, and viewed in more detail. Continue from any step. The image can be manipulated using the “mouse” or the keyboard. Right clicking over the image brings up a context menu for controlling its movement. The following actions may be performed on the image:
 [28]
[28] [29]
[29]These loading plan views cannot be printed directly from their windows. In order to print the loading plans, or to save them in universally accepted formats, such as PDF, Microsoft Word, HTML, and others, or for their presentation without the use of the packer3d software, printing reports [6]must be generated.
_0.gif) |
Packer3d creates Loading Plans for multiple vehicles according to the list in the Transportation Vehicles List window [30]. The list can include various types of vehicles, with any number of vehicles of each type, and is managed by using the buttons on the Vehicle List Control Panel [31]. Vehicle order can be changed by using the Change Vehicle Order Arrows [32]. Vehicles are loaded in succession – the first vehicle on the list is loaded completely, than the second, and so on, until all of the cargo or every one of the vehicles is loaded. If, for any type of vehicle on the list, the available vehicle quantity field is blank [33], Packer3d will assume that there is no limit on how many vehicles of this type are available. Once such vehicle type is reached in succession, it will be used for loading all of the remaining cargo. Only the items that cannot be loaded into this type of vehicle due to size, weight, or other limitations, will be loaded into the next suitable vehicle on the list.
IMPORTANT: By default, standard Loading Plan calculation does not perform optimization of vehicle selection; vehicles are simply loaded in the order that they appear on the list. To include vehicle selection optimization in the Loading Plan calculation, use Vehicle Optimization in the Calculation menu.
Packer3d includes a transportation vehicle database of more than 250 standard containers, railroad freight cars, trucks, and vans, complete with dimensions, weight capacity, and pictures. This database simplifies the entry of vehicles and their parameters into the Transportation Vehicle List. To open the Transportation Vehicles Database window [34], use Show/Hide DB in the View menu. Find the vehicle in the database, and drag it into the Transportation Vehicles window, where the vehicle’s characteristics can than be modified, if necessary. Transportation vehicle database is not available in the Packer3d Mini version.
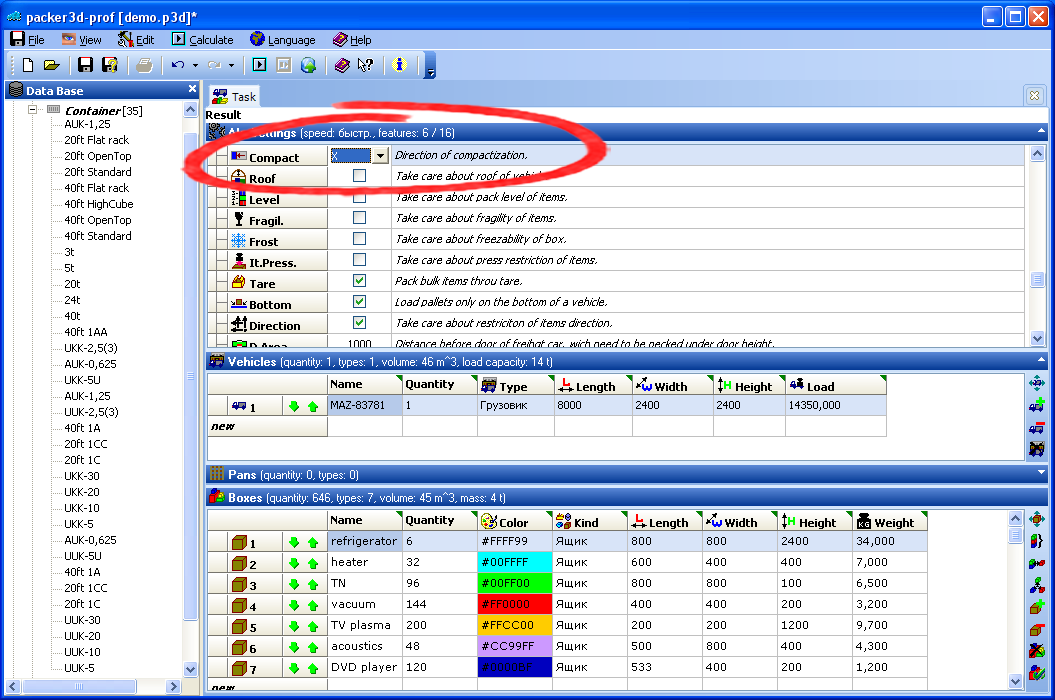
 [35]Loading Style and Loading Direction parameters control the level of detail and the loading order for a Cargo Loading Plan. Please note that these parameters affect only how the loading instructions are PRESENTED in the plan, but not the resulting arrangement of items within a container or a vehicle once it has been loaded. These parameters can be changed after the loading plan is completed, while the plan is viewed in 3D View, Steps, and Tabular modes. A new, different set of loading instructions for the same plan can be generated quickly because the underlying cargo arrangement remains the same.
 [36]"Loading Style"
This parameter controls the level of detail for each step, presented in a Cargo Loading Plan.


 [37]"Loading Direction"


|
 [38]
[38]
In order to determine the best possible cargo arrangement within a container or a vehicle, all feasible placement configurations must be investigated. The drawback of such exhaustive search approach is the amount of time that it would require; even for a relatively small number of items (50), the calculation might take years, even with modern supercomputers. Packer3d application utilises the proprietary Packer3d Core [39] heuristic (approximation) algorithm, based on discrete mathematics, mathematical statistics, and mathematical logic, with neuron network and genetic algorithm elements. This approach makes it possible to arrive at a near-optimum solution for complex tasks in real time. Heuristic coefficients, utilized in algorithm settings, are empirically derived from hundreds of thousands of previous computations. However, Packer3d algorithm also incorporates some exhaustive search elements. The balance between heuristic and exhaustive search components of the algorithm is regulated by the calculation speed parameter. At higher speed settings, heuristics are utilized more than the exhaustive search methods. Lower speed settings usually, but not always, produce better results: Packer3d heuristics are continuously improved, and the highest loading density is often achieved at the fastest setting, which employs predominantly heuristic approach.
IMPORTANT: We recommend using other calculation speed settings only if the loading density, produced at the FAST setting is unsatisfactory. Calculation at the EXHAUSTIVE setting may take unacceptably long. We do not recommend using the EXHAUSTIVE setting if the number of items is grater than 50.

"Fast"
Fast calculation speed: exhaustive search approach is not utilised, cargo blocks of identical items are used.

"Standard"
Standard calculation speed: exhaustive search approach is not utilised, limited use of mixed-item cargo blocks.

"Slow"
Slow calculation speed: limited use of exhaustive search approach, extensive utilization of mixed-item cargo blocks.

"Exhaustive"
Exhaustive calculation speed: the slowest setting, extensive use of exhaustive search approach and utilization of mixed-item cargo blocks.

Packer3d offers five standard step-by-step Loading Reports that can be generated on the basis of a completed Loading Plan. Loading Reports can be saved in PFD, MS Word, HTML, and other common formats, allowing the Loading Plan to be e-mailed, reviewed, edited, and printed on computers that do not have Packer3d software installed.
Since Packer3d Loading Reports are continuously improved, report contents may differ from the examples below, and additional standard reports might be introduced. Detailed information about Loading Reports is contained in the Packer3d User’s Guide, available on our Download [40] page.
IMPORTANT: Packer3d Prof and Packer3d Corp versions offer the capability of editing standard report layouts and creating additional reports by means of the built-in script language.

Summary
Summary report: Loading Plan summary only.

Table
Tabular report: A table of step-by-step cargo loading instructions, indicating exact items coordinates and displacement relative to container axes. This report format is practical for loading a small number of large items.

Brief
Brief report: SKU description and two loading projections for each step.

Report
Standard report: Detailed alignment instructions for each SKU plus two loading projections for each step.

Full
Complete report: Detailed alignment instructions for each item plus four loading projections for each step.

Exporting a Loading Report to an HTML file.
ВLoading Reports can be exported to HTML files, allowing the reports to be placed on the customer’s servers, on the Internet, stored, sent by e-mail, viewed and edited by using MS Word and other applications.
To export a Loading Report to an HTML file, select the tab of the desired Loading Report and click the "Save Report in HTML Format" icon.
This feature is not available in Packer3d Mini version.

Exporting a Loading Report to a PDF file.
Loading Reports can be exported to PDF files by using a virtual PDF printer application. We recommend downloading and installing PDFCreator, an OpenSource application that is distributed free of charge and currently supports 36 languages. You can learn more about this software on the PDFCreator website [41].
 [42]
[42]
Cargo Concentration feature affects the distribution of cargo within a container or vehicle if the cargo does not occupy all of the cargo space. The distribution method is selected in the Features section of the Algorithm Parameters window. The selected Cargo Concentration method applies to all transportation vehicles being loaded. A cargo space is always loaded starting from the far left corner. Cargo Concentration feature has no effect unless there will be empty space left over once all of the cargo is loaded.
IMPORTANT: Cargo Concentration feature requires additional calculations to be performed, and thus will slow down the process of creating a Loading Plan. The feature should not be used when it is known in advance that the cargo will occupy all of the available cargo space.
_0.gif)
"X-Direction:
Cargo is concentrated at the side that is opposite to the doors;
this setting is frequently used when additional cargo is expected to be loaded.
_0.gif)
"Y-Direction:
Cargo is concentrated at the side that is to the left of the doors.
_0.gif)
"Z-Direction:
Cargo is concentrated as close as possible to the floor;
this setting ensures the best cargo stability.
"Off:
Cargo concentration is off.
Usually, but not always, this setting will result in a Loading Plan that is similar to a plan with the concentration setting of X-Direction. Cargo concentration is normally set to off to speed up the preparation of a Loading Plan, or when it is known in advance that the cargo will occupy nearly all of the available space, and thus cargo concentration setting will not make much of a difference.
Grouping feature allows assigning all or part of the cargo to one or more groups with specific characteristics. There are three types of groups:
'Indivisible Set' – a group of items, of which only a complete set should be loaded into any one vehicle. A set cannot be split up between vehicles – ether a complete set is loaded, or none of the items, even if only a single item from the set does not fit into a the same vehicle.
IMPORTANT: Individual items of a set will not necessarily be placed adjacent to each other within the cargo space; however, once the entire cargo is unloaded, complete sets can be assembled. If only certain groups of items will be unloaded at the delivery destination, without moving the rest of the cargo (for example, when the same vehicle is successively unloaded at multiple stops), the Loading Order [11] feature should be used when the Loading Plan for the vehicle is prepared.
 [43]
[43] [44]
[44]

Moderately Incompatible Group – a group of items (SKU’s), of which a complete set should never be loaded into the same vehicle. At least one of the set’s SKU’s should not be loaded with the rest. This group type is mainly used for reducing the risk of theft during the transportation of cargo.
 [45]
[45]
500 split air conditioning systems must be delivered. A split air conditioning system consists of a set of components that are assembled during installation, and each component of a set is shipped in a separate box. Even if only one of the components is missing, a complete system cannot be assembled. Thus, in case of large shipment it can be prudent to split the sets between different truckloads. Four components of the split air conditioning system are included into a Moderately Incompatible “Split A/C Systems” Group.
 [46]
[46]
Packer3d will automatically create an optimized Loading Plan for the entire shipment, and not a single complete set of components will be loaded into the same truck. Theft of a single truckload would be pointless, since not even one complete air conditioning system can be assembled from the components, transported by a single truck.
Highly Incompatible Cargo Group (Dangerous cargos)
Highly Incompatible Group – a group of items (SKU’s), of which two or more different SKU’s should never be loaded together into the same vehicle; only items of the same type (SKU) from the group can be placed in the same truck. If the group consists of five different SKU’s, five separate vehicles will be required to transport the entire cargo group. This group type can be used for shipping dangerous cargos, or for further enhancing the protection from theft during transportation.
 [47]
[47]
Same example with split air conditioning systems as in the Moderately Incompatible Group, except that the four components are included into a Highly Incompatible “Split A/C Systems” Group.
 [48]
[48]
Packer3d will automatically create an optimized Loading Plan for the entire shipment, and since none of the four components are compatible with each other, each type of components will be loaded into a separate truck. If the load planning task included other cargo items, the space, left over after loading the air conditioning components, would be used for the additional items.
A new, empty group is created by clicking the button [49], corresponding to the group type, in the Cargo List window.
Previously created items can be added to an existing group by moving them with the Arrows [50]; new items can also be created directly within a group [51].
To remove an item from a group without deleting the item itself, use the Arrows [52].
To clear a group by deleting all of the group’s items, use the Clear Group button [53].
The entire group, or an item within a group, can be deleted by using the Remove Selected Item from the List button [54].
Grouping feature is activated by selecting the Use Item Grouping for Vehicle Loading checkbox [55] in Algorithm Parameters window.
 |
Pre-Packing feature sequentially carries out the calculations for:
Packing feature is currently in beta testing; a detailed description of the feature will be available once the beta testing is completed.
 |
Palletization feature sequentially prepares two optimized Loading Plans:
Palletization is carried out similarly to loading vehicles [3] sequentially according to a list.
Cargo Concentration feature [7] affects the distribution of loaded pallets within the vehicle, but not the distribution of items on the pallets. Cargo concentration direction of Z (nearest to the floor) is always used for palletization.
IMPORTANT: The following parameters are utilized exclusively for PALLETIZATION:
Once items are palletized, Pallet Cargo Load Planning does not take in to account their individual properties. Placement of pallets within the container or vehicle is determined automatically, and cannot be manually adjusted. The following parameters are taken into account for Pallet Cargo Load Planning:
Example:
If an item’s Orientations allowed [20] parameter is set to Length [60] (place the long side of the box parallel to the long side of the cargo space), the item will be placed with its long side parallel to the long side of the pallet. However, the pallet itself can be placed with its long side across the cargo space, and thus the long side of the item will end up perpendicular to the long side of the container or vehicle.
 [61]
[61]
_0.gif) |
 [62]Each SKU can be assigned a loading order value. These values determine the order, in which SKU’s are loaded into a container or vehicle. When a Loading Plan is created, the SKU’s with loading order value of 0 (zero) will be loaded first, with the value of 1 – second, and so on, and all SKU’s will be arranged within the cargo space in such a way that none of the SKU’s with lower values will have to be moved in order to unload the SKU’s with higher values. For example, all SKU’s with the loading order of 3 can be unloaded without moving any of the SKU’s with the loading order values of 0, 1, or 2. Multiple different SKU’s can be assigned the same loading order value.
It is important to note that once the cargo is loaded, access to the SKU’s with lower loading order values will be blocked by the SKU’s with the higher ones; thus, it would be difficult to unload the SKU’s with lower values if, for some reason, the SKU’s with the higher values could not be unloaded first.
This feature is activated [63] in the Algorithm Parameters window.
IMPORTANT:
_0.gif) |
_0.gif) |
Packer3d can be used to prepare an Additional Cargo Loading Plan for a container or a truck that has already been partially loaded, and for which a copy of the previous Packer3d Loading Plan is available. This feature is typically used when the same vehicle is sequentially loaded at different warehouses, and the cargo to be loaded at the next stop is not known in advance..
Assemble a cargo load from a number of warehouses:
A completed Loading Plan often does not make use of all of the available cargo space; it would be more efficient to add additional cargo to the container or vehicle. Additional Loading Recommendations feature calculates the exact quantity of various items that can be added to maximize to the load.
 [64]
[64]
An order for four types of items: six refrigerators, 32 heaters, 96 televisions, and 144 vacuum cleaners, must be loaded, and the quantity of items, which can then be added to maximize the load, determined.
Loading Plans are created by selecting Additional Loading Recommendations in the Calculation menu; in this example, a total of five Loading Plans will be created.
 [65]
[65]
Loading Plans can be viewed by selecting the corresponding tabs. A regular Loading Plan, without any additional loading, will be displayed under the first tab. Other tabs will contain Additional Loading Plans, which maximize efficiency through additional loading with one of the SKU’s from the Order’s Items window. Packer3d will always display the best (most efficient) Additional Loading Plan. Other Additional Plans will also be displayed, provided that they are at least 80% as efficient. In this example, all of the Additional Plans are displayed because they all meet this condition.
 [66]
[66]
Additional loading with refrigerators – 13 items
 [67]
[67]
Additional loading with heaters – 240 items
 [68]
[68]
Additional loading with TV’s – 360 items
 [69]
[69]
Additional loading with vacuum cleaners – 720 items
Additional loading plans above use only a single SKU. Repeating the procedure allows additional loading with multiple SKU’s.
Suppose both refrigerators and TV’s should be added. The Additional Loading Plan for refrigerators indicates that a maximum of 13 more items can be added to the original load. To leave some room for extra TV's as well, only six more refrigerators are added in the Cargo List window, and a new set of Additional Loading Recommendations is created.
 [70]
[70]
The new Additional Loading Plan for TV's shows that, after adding six more refrigerators to the original load, 216 more TV's can be added as well.
Repeating the procedure several times allows additional loading with any combination of SKU’s.
Completed Loading Plans can be Viewed [2] and Loading Reports Printed [6].
 |
 [71]By default, Packer3d optimizes the use of container or vehicle space by packing the cargo in as tightly as possible. Still, a situation may arise where the available cargo capacity is insufficient to accommodate all of the cargo that has to be transported. In such cases it may be advantageous to ship the higher-value items, and leave the least valuable items for later, or in other words, to optimize the load based on cargo cost. Load Optimization by Cargo Cost feature will maximise the value of the shipment. Value optimization does not mean that the most expensive items are simply loaded first, but that the overall value of the entire shipment is maximized. For example, if loading a single $100 item would prevent three $50 items from being loaded, the $100 item would be the one left behind, because the total value of the three cheaper items is grater.
Load Optimization by Cargo Cost feature is activated in the Algorithm Parameters window [72], and requires that the item cost is entered in the Value field [71] for each item type.
IMPORTANT: In cases where objectives of Loading Order [11] and Load Optimization by Cargo Cost functions are mutually exclusive, Loading Order will have the priority.
 |
A Project (Loading Task and Loading Plan) is stored by Packer3d as a set of data tables in the form of XML files with .xml, .p3d, .p3a, .p3v, .p3p, .p3i, and .p3r extensions. Each aspect of a project (Cargo List, Vehicle List, Algorithm Settings, and so on) is stored as a separate table. Graphical representations of Loading Plans are not stored as graphics, but in the form of text files. Loading Plan visualizations are generated by Packer3d from the data, stored in the files.
XLS [73], TXT [74] and XML [75] file formats.
In the File menu, select Import and than select the data table to be imported [76]; in the dialog box that opens, select the file format. If a project is already open in Packer3d, importing Loading Task data will replace the existing data for the selected table only, and importing a Loading Plan will add the data to the existing Plan.
XLS [73], TXT [74] and XML [75] file formats.
In the File menu, select Export and than select the data table to be exported; in the dialog box that opens, select the file format.
Loading Plans can also be exported to HTML [77] and PDF [78] files (export in HTML format is not supported in Packer3d Mini version); exporting Loading Plans to these file formats is described below.

XML format description for a Project, including:

XLS format description for a Project, including:

TXT format description for a Project, including:

Exporting a Loading Plan Report to an HTML file:
Loading Plan Reports can be exported to HTML files, allowing the reports to be placed on the customer’s servers, on the Internet, stored, or sent by e-mail.
To export a Loading Plan Report to an HTML file, select the tab with the desired report and click the Save Report in HTML Format button [85]. This feature is not available in Packer3d Mini version.

Exporting a Loading Plan Report to a PDF file:
Loading Plan Reports can be exported to PDF files by using a virtual PDF printer application. We recommend downloading and installing PDFCreator" [41], an OpenSource application that is distributed free of charge and currently supports 36 languages. You can learn more about this software on the PDFCreator website.
Data can be imported automatically when Packer3d is launched from the command line:
Command line format:
packer3d-online.exe [< input file 1 > < input file 2 > ... < input file n >]
packer3d-mini.exe [< input file 1 > < input file 2 > ... < input file n >]
packer3d-prof.exe [< input file 1 > < input file 2 > ... < input file n >]
packer3d-corp.exe [< input file 1 > < input file 2 > ... < input file n >]
Each file being imported can be in any of the supported formats; each successive file will replace the corresponding Loading Task data, and add data to the Loading Plan.
Example: packer3d-prof.exe demo.xml items.txt, where demo.xml is a complete Project with a full set of data tables, and items.txt is a table of new cargo items.
Packer3d will first open the demo.xls project, and than will replace the cargo items list with the new list from items.txt file.
If the file being imported contains only a Loading Plan, this plan will be added to the Project that is already open.
Standards
Height limitsVehicle and combination of vehicles
|
Width limitsVehicle and combination of vehicles
The width limit is 2.6 m for vehicle and combination of vehicles. However, this width limit is 2.5 m for trailers and semi-trailers with a track width (distance between the extremities of each outer wheel on each axle) under 2.5 m. |

|
Period
|
Normal
|
Thaw
|
|---|---|---|
| Front single axle |
7 250 kg
|
7 250 kg
|
| Rear single axle |
10 000 kg
|
8 000 kg
|
| Gross vehicle weight |
17 250 kg
|
15 250 kg
|
*Load included.
|
Period
|
Normal
|
Thaw
|
|---|---|---|
| Front single axle |
7 250 kg
|
7 250 kg
|
| Rear single axle |
18 000 kg
|
15 500 kg
|
| Gross vehicle weight |
25 250 kg
|
22 750 kg
|

*Load included.
|
Period
|
Normal
|
Thaw
|
|---|---|---|
| Front single axle |
14 000 kg
|
14 000 kg
|
| Rear single axle |
18 000 kg
|
15 500 kg
|
| Gross vehicle weight |
32 000 kg
|
29 500 kg
|

*Load included.
*Load included.
|
Period
|
Front single axle |
Tandem axle
|
Tandem axle under semi-trailer
|
Gross vehicle weight
|
|---|---|---|---|---|
| Normal |
5 500 kg |
18 000 kg |
18 000 kg |
41 500 kg |
| Thaw |
5 500 kg |
15 500 kg |
15 500 kg |
36 500 kg |

*Load included.
|
Period
|
Front single axle |
Tandem axle |
Triple axle under semitrailer**
|
Minimum distance "a"
|
Gross vehicle weight
|
|---|---|---|---|---|---|
| Normal |
5 500 kg |
18 000 kg |
21 000 kg |
4,0 m |
44 500 kg |
| Normal |
5 500 kg |
18 000 kg |
24 000 kg |
4,5 m |
47 500 kg |
| Normal |
5 500 kg |
18 000 kg |
26 000 kg |
5,5 m |
49 500 kg |
| Thaw |
5 500 kg |
15 500 kg |
18 000 kg |
not required |
39 000 kg |
| Thaw |
5 500 kg |
15 500 kg |
21 000 kg |
not required |
42 000 kg |
| Thaw |
5 500 kg |
15 500 kg |
22 000 kg |
not required |
43 000 kg |
** According to distance «c» between axles and semitrailer.

*Load included.
The 4 axles under semitrailer must be equiped with a suspension capable of equalizing the load on each axle.
|
Period
|
Front single axle |
Tandem axle |
4-axle under semitrailer**
|
Minimum distance "a"
|
Gross vehicle weight
|
|---|---|---|---|---|---|
| Normal |
5 500 kg |
18 000 kg |
32 000 kg |
6,0 m |
55 500 kg |
| Normal |
5 500 kg |
18 000 kg |
32 000 kg |
5,5 m |
55 500 kg |
| Thaw |
5 500 kg |
15 500 kg |
27 500 kg |
not required |
48 500 kg |
| Thaw |
5 500 kg |
15 500 kg |
27 500 kg |
not required |
48 500 kg |
** According to distance «c» corresponding to spacing of triple axle under semitrailer.

*Load included.
|
Period
|
Front single axle |
Tandem axle |
Tandem axle under front semitrailer
|
Dolly
|
Tandem axle under rear semitrailer
|
Gross vehicle weight
|
|---|---|---|---|---|---|---|
| Normal |
5 500 kg |
18 000 kg |
18 000 kg |
10 000 kg |
18 000 kg |
53 500 kg |
| Thaw |
5 500 kg |
15 500 kg |
15 500 kg |
8 000 kg |
15 500 kg |
53 500 kg |
*Load included.
|
Period
|
Front single axle |
Tandem axle |
Triple axle under semitrailer
|
Tandem axle under semitrailer
|
Gross vehicle weight
|
|---|---|---|---|---|---|
| Normal |
5 500 kg |
18 000 kg |
21 000 kg |
18 000 kg |
59 000 kg** |
| Normal |
5 500 kg |
18 000 kg |
24 000 kg |
18 000 kg |
59 000 kg** |
| Thaw |
5 500 kg |
15 500 kg |
18 000 kg |
15 500 kg |
54 500 kg |
| Thaw |
5 500 kg |
15 500 kg |
21 000 kg |
15 500 kg |
57 500 kg |
** This limit is extended to 62 500 kg on autoroutes and highway 185; on other roads, a special permit must be obtained and special requirements apply.
 |
As a rule, all data systems allow loading of third party software. The packer3d software can also be run from command line as a surface program, while indicating the file from which it can import its data as a parameter. This property of the software is in the core of the single user (local) model of integration.
This is the integration principle used in “Packer3d 1C77”, an expansion of the typical 1C Enterprise 7.7 configuration for compatibility with packer3d.
Packer3d can be integrated in the same way into practically any data system.
Packer3d Mini and Packer3d Prof models are local and can only be accessed from the computer on which the protective USB-key is installed. The Packer3d Corp model is multiuser. It can be installed onto the server along with the USB-key. In this case the number of users that access it simultaneously is unlimited.
The Packer3d Corp model has a networked model of integration [17] with the active data system of the enterprise.
 |
Comming soon...
 |
 [88]
Defining the “Tonnage” field in vehicle properties determines the maximum allowable total mass of cargo that can be loaded in a single vehicle of this type. In the case that the vehicle is loaded to its mass limit, but the cargo does not occupy the entire volume of the cargo body, the cargo in the cargo body will be distributed according to “Allowable axel pressure” [19] and “Direction of cargo compacting” [7] settings.
[88]
Defining the “Tonnage” field in vehicle properties determines the maximum allowable total mass of cargo that can be loaded in a single vehicle of this type. In the case that the vehicle is loaded to its mass limit, but the cargo does not occupy the entire volume of the cargo body, the cargo in the cargo body will be distributed according to “Allowable axel pressure” [19] and “Direction of cargo compacting” [7] settings. [89]
This is true for pallets, except that the settings for “Direction of cargo compacting” [7] does not influence the distribution of cargo on a pallet. During the loading of a pallet, Z-compacting is always used, in other words, the cargo is placed as close to the bottom of the pallet as possible.
[89]
This is true for pallets, except that the settings for “Direction of cargo compacting” [7] does not influence the distribution of cargo on a pallet. During the loading of a pallet, Z-compacting is always used, in other words, the cargo is placed as close to the bottom of the pallet as possible. [90]
The vehicle load lifting constraint can be turned on/off in program settings. If turned off in the settings, the load lifting capability of the vehicle displayed in the vehicle properties will be ignored. Turning off this parameter does not affect the load lifting capability of the pallets.
[90]
The vehicle load lifting constraint can be turned on/off in program settings. If turned off in the settings, the load lifting capability of the vehicle displayed in the vehicle properties will be ignored. Turning off this parameter does not affect the load lifting capability of the pallets.During the calculation for the optimal loading plan the algorithm can place the items with their height directed upwards, or turn them on their side of edge, in order to maximize loading density. The given feature limits rotation of the items during loading and transport.
The choice of allowable orientation occurs separately for each SKU. In total, there can be 4 combinations of orientation for placing the items, which is determined by 2 independent switches:

 [93]
[93]
 [91]
[91]
 [92]
[92]
 [94]
[94]During calculation of the optimal cargo loading plan the algorithm can place cargo items with their height upward, sideways, or on their edges in order to maximize loading density. The rotation of the items can be limited using the “Orientations allowed” [20] feature.
Generally, cargo items can withstand different pressure on different edges. Usually an items can handle more pressure from above than from an angle or sideways. “Stacking Limits in kg” allows the input of maximum allowable pressure in Kg on each of the 3-dimensional pairs of edges of the item, in case it ends up being turned. This is done separately for each SKU. If assigned a value of “0” (“zero”), nothing will be placed on the given edge of the item.
Warning! If a value of 0 “zero” is assigned for all edges of the item, then no matter what the item’s orientation, nothing will be placed on top of it.

Maximum allowable pressure on the cargo item from above in Kg, if it is height is directed vertically. Designated by “Pressure h.” [95] parameter. Sometimes this is designated on the items with a special symbol [96].

Maximum allowable pressure on the cargo item from above in Kg, if it is oriented so that its width is directed vertically. Designated by “Pressure w.” [97] parameter. This parameter is ignored if the “Fix h.” [91] (Fix height of item to always be vertical) parameter is enabled.

Maximum allowable pressure on the item from above in Kg, if it is oriented so that its length is directed vertically. Designated by the “Pressure l.” [98] parameter. This parameter is ignored if either the “Fix h.” [91] (Fix height of item to always be vertical) parameter, or the “Fix l.” [92] (Fix length of item to always point in the direction of vehicle’s movement) is enabled.
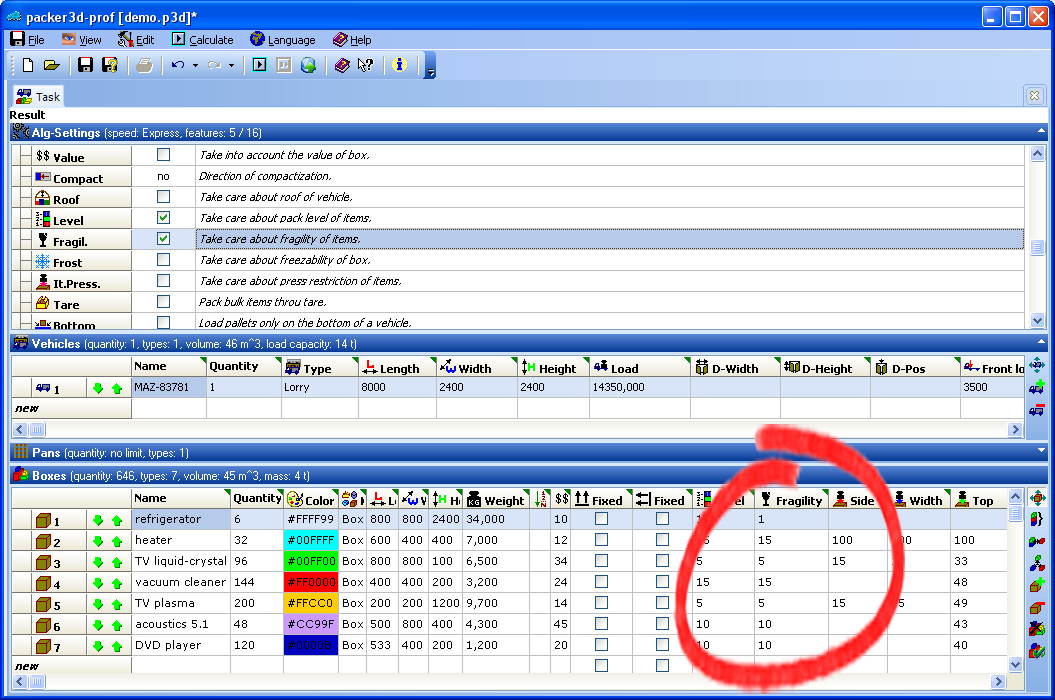
Cargo can be fragile or not fragile. No reasonable worker would put a tray of bricks on a box of fine china. He/she understands that the china would be crushed. How does one explain this to the software, that it cannot set bricks on china? The simplest and most comprehensible method for the software is to designate Stacking constraints in Kg [21], which relate how much weight a box can handle. One can designate, say, 5 Kg for a cardboard box full of china, and unlimited amount for the tray of bricks. This means that during loading calculations the sum of the weights of all the boxes stacked on top of the box with china will not exceed 5 Kg, but everything will be loaded on top of the bricks without limit. The safety of the cargo will be observed. Everything is simple, except for one issue: how often do we know the maximum pressure that a box can take from above? Generally, such information is not found on the boxes and is unavailable to us. How else then, can we assign a level of fragility to our goods? Two additional ways of assigning fragility come to our rescue: “Max Stack” and “Fragility Level”.
The use of these constraints during loading plan calculation can be quickly turned on/off in the Algorithm parameters window [99]
.
Warning! Conditions for fragility constraint “Stacking constraints in Kg”, “Max Stack”, and “Fragility Level” can be employed simultaneously [100]. During loading plan calculation, each one of them will be considered.
Max Stack:

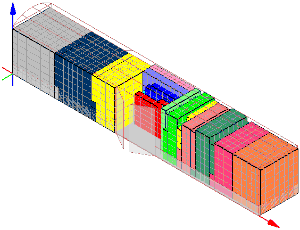
Quite often cargo items are marked with a “limit on number of layers in stack” [101] or something similar. This designates the maximum number of identical cargoes that can be stacked on one another, where n is the maximum amount. This is the information that needs to be entered into the “Frag.” [102] of cargo field. In this case, the height of the stack of items of this type will not exceed n items.
Other SKU may be stacked above this stack, if they satisfy the conditions of “Stacking Limits in kg” [21] and “Levels of stacking”.
During winter time, the coldest zones are located around the doors. The lowered temperature can spoil some goods, such as certain consumables. For example (let us assume) lighter beers can handle lower temperatures very well, while darker beers “are afraid” of temperatures that are too low. It is possible to enable the property of “Temperature sensitive” [104] for every SKU. During the loading plan calculation such cargo will be concentrated a maximum distance from the doors. When using this functionality, please do not forget to enable it in the “Algorithm parameters” [105] window.
SKU shown in yellow is placed near the doors if the "Temperature sensitive" option is off.

SKU shown in yellow is placed as far as possible away from the doors if the "Temperature sensitive" option is on.
In the loading plan calculations for a railroad freight car, it is possible to include the loading of space under the flared portion of the rounded roof. For this, it is necessary to enter the height of the freight car’s rounded roof [106] (distance between the top of the main part of the freight car and the middle of the rounded roof) in the “Roof” [107] field of the freight car’s parameters. When using this features, do not forget to enable it in the “Algorithm Parameters” window [108].
.gif)
“Roof” = 0 or leave blank.
The space under the rounded roof is not loaded.
_0.gif)
“Roof”= a whole number greater than zero.
The space under the rounded roof is loaded.
Links:
[1] http://www.packer3d.com/program/features/overview
[2] http://www.packer3d.com/program/features/result
[3] http://www.packer3d.com/program/features/vehicles
[4] http://www.packer3d.com/program/features/loading
[5] http://www.packer3d.com/program/features/speed
[6] http://www.packer3d.com/program/features/reports
[7] http://www.packer3d.com/program/features/compact
[8] http://www.packer3d.com/program/features/group
[9] http://www.packer3d.com/program/features/tara
[10] http://www.packer3d.com/program/features/palletising
[11] http://www.packer3d.com/program/features/order
[12] http://www.packer3d.com/program/features/addloading
[13] http://www.packer3d.com/program/features/recommendations
[14] http://www.packer3d.com/program/features/cost
[15] http://www.packer3d.com/program/features/impexp
[16] http://www.packer3d.com/program/features/integration
[17] http://www.packer3d.com/program/features/expintegration
[18] http://www.packer3d.com/program/features/tonnage
[19] http://www.packer3d.com/program/features/axes
[20] http://www.packer3d.com/program/features/orientations
[21] http://www.packer3d.com/program/features/press
[22] http://www.packer3d.com/program/features/fragility
[23] http://www.packer3d.com/program/features/freezing
[24] http://www.packer3d.com/program/features/roof
[25] http://www.packer3d.com/sites/default/files/resume-b_en.gif
[26] http://www.packer3d.com/sites/default/files/table-b_en.gif
[27] http://www.packer3d.com/sites/default/files/3d-b_en.gif
[28] http://www.packer3d.com/sites/default/files/steps-b_en.gif
[29] http://www.packer3d.com/sites/default/files/rest-b_en.gif
[30] http://www.packer3d.com/sites/default/files/scr1_1_en.png
[31] http://www.packer3d.com/sites/default/files/scr2_1_en.png
[32] http://www.packer3d.com/sites/default/files/scr3_en.png
[33] http://www.packer3d.com/sites/default/files/scr4_en.png
[34] http://www.packer3d.com/sites/default/files/scr5_en.png
[35] http://www.packer3d.com/sites/default/files/loading-scr3-b_en.png
[36] http://www.packer3d.com/sites/default/files/loading-scr2-b_en.png
[37] http://www.packer3d.com/sites/default/files/loading-scr1-b_en.png
[38] http://www.packer3d.com/sites/default/files/speed-scr1-b_en.png
[39] http://www.packer3d.com/packer3d-core
[40] http://www.packer3d.com/download
[41] http://www.pdfforge.org/products/pdfcreator
[42] http://www.packer3d.com/sites/default/files/compact-scr-b_en.png
[43] http://www.packer3d.com/sites/default/files/group_us_b_en.png
[44] http://www.packer3d.com/sites/default/files/group_us_b_res_en.gif
[45] http://www.packer3d.com/sites/default/files/group_slab_b_task_en.png
[46] http://www.packer3d.com/sites/default/files/group_slab_b_en.png
[47] http://www.packer3d.com/sites/default/files/group_siln_b_task_en.png
[48] http://www.packer3d.com/sites/default/files/group_siln_b_res_en.png
[49] http://www.packer3d.com/sites/default/files/group-scr3_en.png
[50] http://www.packer3d.com/sites/default/files/group-scr2_en.png
[51] http://www.packer3d.com/sites/default/files/group-scr5_en.png
[52] http://www.packer3d.com/sites/default/files/group-scr6_en.png
[53] http://www.packer3d.com/sites/default/files/group-scr7_en.png
[54] http://www.packer3d.com/sites/default/files/group-scr8_en.png
[55] http://www.packer3d.com/sites/default/files/group-scr4_en.png
[56] http://www.packer3d.com/sites/default/files/pal-scr2-b_en.png
[57] http://www.packer3d.com/sites/default/files/pal-scr1-b_en.png
[58] http://www.packer3d.com/sites/default/files/pal-scr3-b_en.png
[59] http://www.packer3d.com/sites/default/files/pal-scr4-b.gif
[60] http://www.packer3d.com/sites/default/files/turn-scr3-b.gif
[61] http://www.packer3d.com/sites/default/files/pal-scr5-b_en.png
[62] http://www.packer3d.com/sites/default/files/order-scr-b_en.png
[63] http://www.packer3d.com/sites/default/files/order-scr-b1_en.png
[64] http://www.packer3d.com/sites/default/files/scr2-b_en.png
[65] http://www.packer3d.com/sites/default/files/scr3-b_en.png
[66] http://www.packer3d.com/sites/default/files/scr4-b_en.gif
[67] http://www.packer3d.com/sites/default/files/scr5-b_en.gif
[68] http://www.packer3d.com/sites/default/files/scr6-b_en.gif
[69] http://www.packer3d.com/sites/default/files/scr7-b_en.gif
[70] http://www.packer3d.com/sites/default/files/scr8-b_en.gif
[71] http://www.packer3d.com/sites/default/files/cost-scr-b_en_0.png
[72] http://www.packer3d.com/sites/default/files/cost-scr1-b_en.png
[73] http://en.wikipedia.org/wiki/Microsoft_Excel
[74] http://en.wikipedia.org/wiki/Text_file
[75] http://en.wikipedia.org/wiki/XML
[76] http://www.packer3d.com/sites/default/files/impexp-scr3-b_en.png
[77] http://en.wikipedia.org/wiki/HTML
[78] http://en.wikipedia.org/wiki/Portable_Document_Format
[79] http://www.packer3d.ru/downloads/ver3/format/def-alg.xml
[80] http://www.packer3d.ru/downloads/ver3/format/veh-format.xml
[81] http://www.packer3d.ru/downloads/ver3/format/pal-format.xml
[82] http://www.packer3d.ru/downloads/ver3/format/itm-format.xml
[83] http://www.packer3d.ru/downloads/ver3/format/itm-format.xls
[84] http://www.packer3d.ru/downloads/ver3/format/itm-format.txt
[85] http://www.packer3d.com/sites/default/files/impexp-scr4-b_en.gif
[86] http://ops.fhwa.dot.gov
[87] http://www.packer3d.com/online/packer3d-online
[88] http://www.packer3d.com/sites/default/files/tonn-b_en.png
[89] http://www.packer3d.com/sites/default/files/tonn-p-b_en.png
[90] http://www.packer3d.com/sites/default/files/tonn-n-b_en.png
[91] http://www.packer3d.com/sites/default/files/turn-scr2-b_en.png
[92] http://www.packer3d.com/sites/default/files/turn-scr3-b_en.png
[93] http://www.packer3d.com/sites/default/files/turn-scr1-b_en.png
[94] http://www.packer3d.com/sites/default/files/turn-scr4-b_en.png
[95] http://www.packer3d.com/sites/default/files/press3-scr-b_en.png
[96] http://www.packer3d.com/sites/default/files/1-Pressure-on-the-box(slide2)_0.gif
[97] http://www.packer3d.com/sites/default/files/press2-scr-b_en.png
[98] http://www.packer3d.com/sites/default/files/press1-scr-b_en.png
[99] http://www.packer3d.com/sites/default/files/common1_en.png
[100] http://www.packer3d.com/sites/default/files/common_en.png
[101] http://www.packer3d.com/sites/default/files/stack-logo.gif
[102] http://www.packer3d.com/sites/default/files/stack-scr_en.png
[103] http://www.packer3d.com/sites/default/files/level-scr_en.png
[104] http://www.packer3d.com/sites/default/files/scr2_en.png
[105] http://www.packer3d.com/sites/default/files/scr1_en.png
[106] http://www.packer3d.com/sites/default/files/roof.gif
[107] http://www.packer3d.com/sites/default/files/scr1_en_0.png
[108] http://www.packer3d.com/sites/default/files/scr2_en_0.png


_0.gif)